Setup and Configure of SQL AlwaysOn
So this is how to get SQL AlwaysOn up and running. We utilize SQL with solutions we deploy for customers; some customers have SQL and others expect me to install and configure it. I am NOT an SQL expert, but I know from KB’s/Whitepapers/blogs and experience how to stand SQL up as well as get it running. I just don’t do it frequently. So this is a reminder for me on how to do it, and I’m hopeful that this helps someone in the same situation.
Just to put it out there, I don’t go into the design side of things but I did reference the following paper VMware Workspace ONE and VMware Horizon Reference Architecture, this blog is more a “How to”
If something is wrong please let me know, I’m all about learning
Overview
2 VM’s running Windows 2016 with SQL Server 2016 Enterprise and using AlwaysOn
Note: SQL Standard does work but is limited
Availability groups to protect critical DataBases.
Specs
I used 2xVM’s with 2 x vCPU, 8GB Ram, 2 Networks (Production ,SQL-HB) 6 HD’s each.
Prerequisites
Create an AD Services account (svc-sql)
Create OU and place all SQL servers in it
4 IP’s = 2 for Hosts, 1 for SQL-VIP, 1 per AVG for SQL Listener
2 IP’s = 2 for Hosts non-routable
Correct Timezone and NTP
Forward and reverse DNS working
Witness Fileshare
Turn off Firewall or add required ports
Configure VMware vSphere® Storage DRS™ anti-affinity rules to separate the VMs on different VMware ESXi hosts
SQL-HB Portgroup, just layer-2 and tag with VLAN
Install and Patch Windows
Mount and create HD’s and name them, these need to be the same on all servers.


Assign Static IP’s for NIC’s, for the SQL-HB, I used a private 192.168.200.1,2/252

Unselect everything except TCP/IPv4 for the SQL-HB only. Once all servers are completed, ping other nodes to make sure the SQL-HB works.
Add Service (svc-sql) account to Local Administrators Group

Installation & Configure - Failover Clustering
On each Server from Server Manager > Manage> Add Roles and Features
Select Failover Clustering and Install
Open Failover Cluster Manager
Right Click
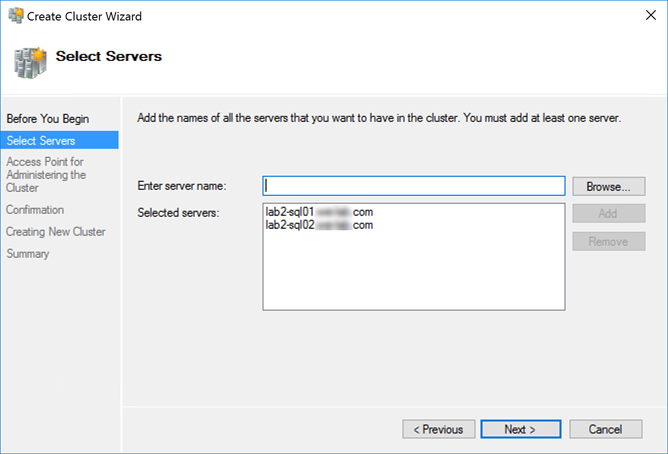
Create Cluster
Enter names of servers to add to cluster > Next
Yes to Validation > Next
Next > Run all tests > Next
Review report and look for errors and warnings
Resolve issues
Enter Cluster Name & IP
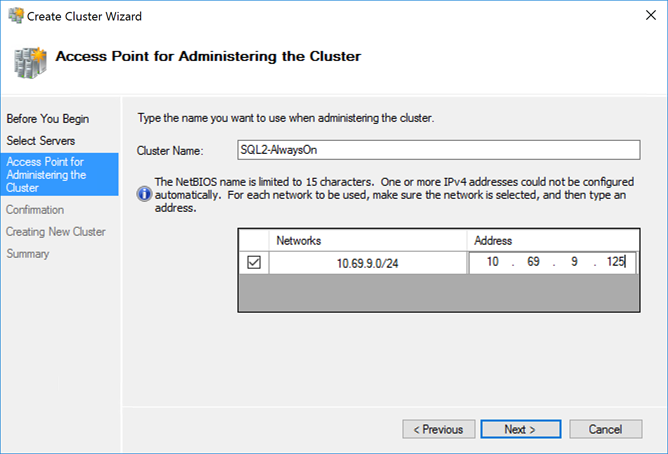
Next

Next once Confirmed

Finish
Ignore the error “No appropriate disks could be found for the witness disk”
Next, we are going to fix the “Witness Warning”.
The current configuration should look like this:
(Notice the lack of a witness.)

Add Witness
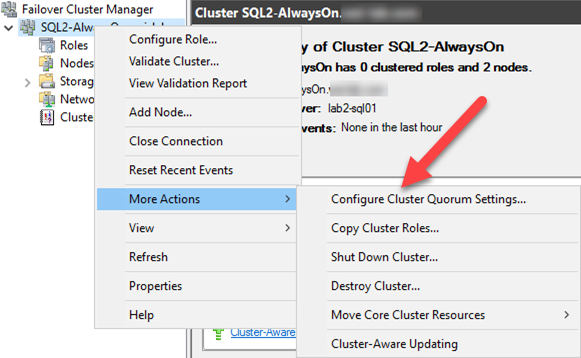
To add a witness, right click Cluster Name
More Actions > Configure Cluster Quorum Settings
Next > Select the Quorum Witness

Next

Select Configure a file share witness > Next
I have created a VM for this Witness, if you have a file server I would use that instead

Browser to the server and share
Note: On the share itself I gave Change permissions to the SQL2-AlwaysOn Computer Object
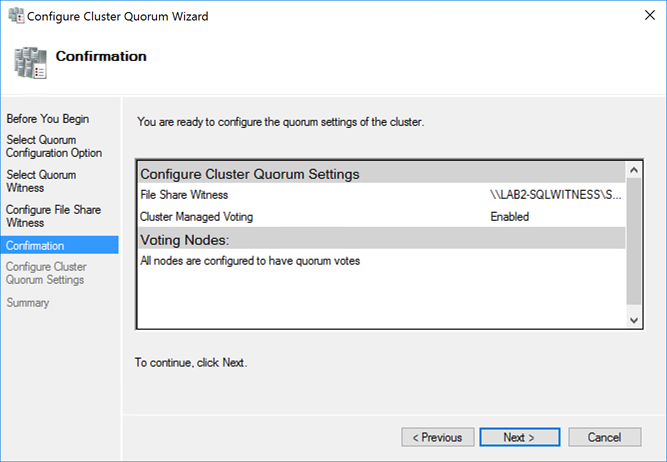
Next

Finish

The Witness share is now created
Cluster Network Setting
Select Cluster Name and select Networks
Check to make sure the 192.168.200.0/30 is for Cluster Use only

I also rename the Name of the network to reflect its purpose….i.e SQL HB & Production
Move SQL to other Node
Right Click Cluster > Select More Actions > Move Core Cluster Resources > Select Node…

Select Node and Click OK

The Cluster has been moved to the other server

Check Cluster Core Resources – Everything Online?
Delegate Control
Open Active Directory Users and Computers select View > Advanced Features
Right click SQL Servers OU select Properties > Security Tab
Select Advanced button
Select Add
Click Select a Principal
Select Objects Types

Check Create Computers Objects click OK
Change Cluster Subnet Threshold
Open Powershell and enter the following commands:

(Get-Cluster).SameSubnetThreshold=10
(Get-Cluster).crossSubnetThreshold=20
get-cluster | fl *subnet*
Installing SQL
1. Mount ISO and Select New SQL Server stand-alone Installation

Next > Accept Terms

Select Database Engine Services > Change Drive letters to reflect correct locations

Rename the Instance if required

Change the Account Name to the Service Account that was created and enter password

Change Authentication Mode to Mixed Mode and Add Current User

Select Data Directories tab and Change the Drive letters to reflect correct location

Again change Drive letter for correct location

Review summary and Install
Now perform the same install on the second server using the same settings.
Once SQL is installed, install SQL Server Management Tools
Restart both servers make sure all SQL Services start as expected
Enable SQL Always On
Log in to each SQL server and open SQL Server Configuration Manager
Select SQL Server Services and then right Click SQL Server > Properties
Select AlwaysOn High Availability tab and check Enable > OK
Right click SQL Server and restart the SQL Service

Create SQL Cluster
Open SQL Server Configuration Manager (Do on all servers in cluster)
Select SQL Server Services > SQL Server
Right Click > Properties
Select AlwaysOn High Availability tab
Check Enable AlwaysOn Availability Groups
Restart SQL Server
Open Microsoft SQL Management Studio
Create a Database and take a Backup
Select Always On High Availability from menu
Right click and select New Availability Group and follow wizard
Name the Group > Next
Select Database > Next
Select Add Replica and enter the other server
Change Availability Mode to Synchronous commit

Select Listener Tab
Select Create an availability group
Enter Listener DNS Name
Enter port 1433
Select Add.. to assign Static IP
Select public IP Subnet
Enter IPv4 Address > click OK
Next
Leave data synchronization as Automatic seeding > Next
Check Validation results and correct issues if any
Right Click new AV Group and select Show Dashboard check for issues.

Sync Accounts
Open Powershell and enter the following
install-module -Name dbatools
Set-DbatoolsInsecureConnection -SessionOnlyUse the format
Copy-DbaLogin -source lab2-sql01 -Destination lab2-sql02
sync-DbaLoginPermission -source lab2-sql01 -Destination lab2-sql02
I hope this helps