Storage Groups

What are they? Storage groups are a means of copying Packages/AppStacks (VMKD’s) from one location to another.

What’s the point? Well, you may want to spread the AppStacks to lessen the load on a single LUN. i.e instead of 1 LUN serving the AppStacks you could have multiple LUN’s. A more frequent use case is in a multisite Horizon deployment when a user could attach to a desktop at either location(s).

In this example, I will walk you through a multisite setup.

So a couple of things are required to make this work

Transition LUN or NFS share. This can be low-cost storage as performance is not needed, why? because we are not going to allow the users to attach to it. This will just be used for replication between the sites. This storage needs to be available to the ESXi hosts at both sites

Entitlements, need to make sure these are in sync and we use a fling to do this.

App Volumes Entitlement Sync

So a quick logical look on how this is going to work.

2020-07-14_15-26-23.jpg

Assuming the AppStacks/Packages are created at Site A we will start there, create the Storage Group mark the Transition LUN as non-attachable, and then make sure the AppStacks/Packages are copied to the Transition LUN.

Then do the same to the other Site.


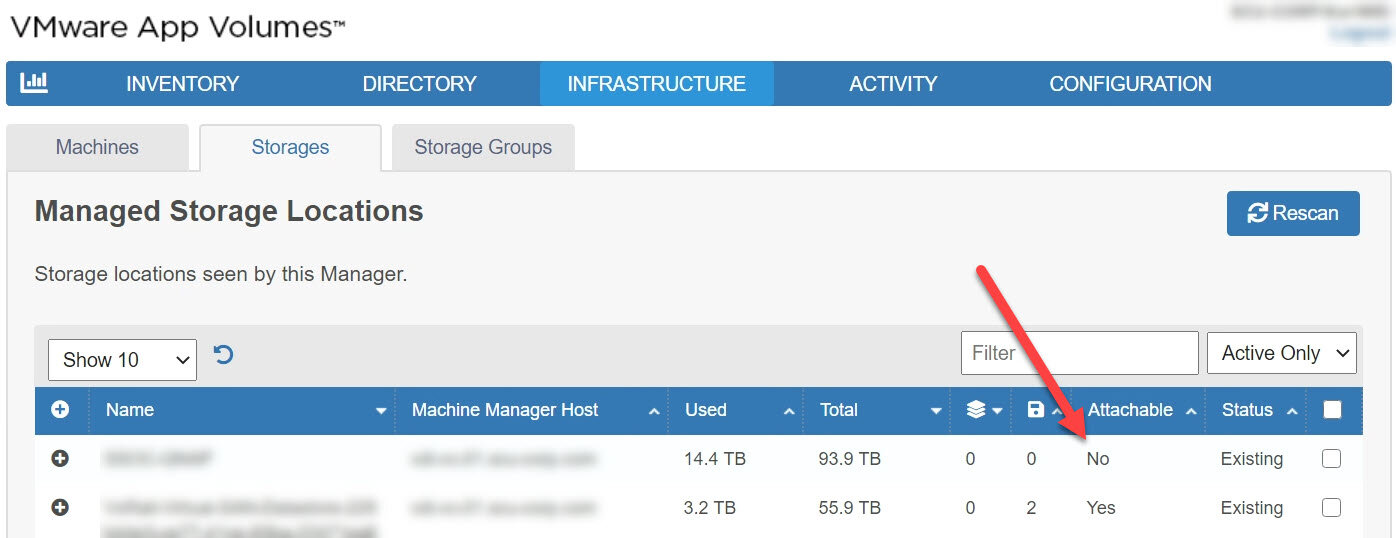
Once logged into AppVolumes Manager(Site A), select Infrastructure> Storages

Notice the Transition LUN is Attachable, meaning users would use the AppStacks that are on this slow storage

Notice the Transition LUN is Attachable, meaning users would use the AppStacks that are on this slow storage

Select the Transition LUN and Make As Not Attachable

2020-07-14_13-42-09.jpg

The Storage will not longer Attachable

2020-07-14_13-42-48.jpg

Select Infrastructure > Storage Groups > Create Storage Group

2020-07-14_13-43-35.jpg

Name the Storage Group, in this example, I am creating the AppStacks/Packages at Site A, So I am NOT selecting Automatically Import AppStacks and Packages, this will be set at Site B.

Select Automatically Replicate AppStacks and Packages.

Select Spread as the Distribution Strategy

Set the Template Storage as the vSAN or Production LUN

Set the Storage Selection to Direct (I selected this as I didn’t want the AppStacks to replicate to local SSD)

Select Create

2020-07-14_13-44-25.jpg

Browse to the FQDN/log of the AppVolumes Server i.e “https://avm01.demo.com/log” you will see the live logs. Do a CTRL+F and search for the name of the Storage Group, in my case AppV QNAP. Should see Completed 200 OK. Just means the Storage Group has been created

2020-07-14_14-42-16.jpg

This next part shows that the replication happened and that the files were copied over.

2020-07-14_13-56-58.jpg

Login into vCenter at Site A, select Storage > Production Storage and browser the /appvolumes/packages (AppVolumes 2.X is /cloudvolumes/apps) location. You should see the AppStacks/Packages that you created/

2020-07-14_14-50-25.jpg

Now do the same for the Transition LUN, the files should be in sync. If they are not you can force a replication to happen from the Storage Group. Replication happens Automatically every 4 hours.

2020-07-14_14-59-21.jpg

Before you start the App Volumes piece make sure that the ESXi hosts can mount the Transition LUN before you create the Storage Group.

Once complete now perform the same steps at Site B but this time Select “Automatically Import”,

2020-07-14_15-09-40.jpg

After the sites are in sync, do a sync on the entitlements and test. App Volumes Entitlement Sync

AppVolumes 4 - What the Package

Over the last few weeks I have been working with a customer who had a lot of 2.X AppStacks that needed to be migrated to AppVolumes 4. I utilized the VMWare AppVolumes migration utility which, for the most part, worked fine. I had some issues with AppStacks over (bigger than?) 6GB. I’m not sure if it was the AppStacks or the utility itself. In the end we ended up turning on 2.X feature in AVM 4 and moving the AppStacks.

AppVolumes 4 has done things a little differently. They are no longer called AppStacks, these are now called Packages. This is the Application/Program tab. At first I was confused, but now that things are making sense I thought I would share my findings. I am going to run through the “Package” creation.

First a visual,

Notice Notepad ++ 7.8.3 has the flag Current set. This means users “Assigned” this Application will get that version of the Package

Notice Notepad ++ 7.8.3 has the flag Current set. This means users “Assigned” this Application will get that version of the Package

What do I have

  • AppVolumes 4 server

  • Capture VM

  • Notepad ++ install bits on file share

  • 2 Security groups, Prod and Test

Capture VM

I am using Windows 10 x64 1809. Base install, VMTools, Patched with AppVolumes 4 agent installed with a powered off Snapshot.

Capture process

Nothing really has changed here from AppVolumes 2.X, except some of the wording and there are a few extra prompts.

Once logged into AppVolumes Manager, select Inventory > Applications and select Create

2020-04-20_12-07-02.jpg

Name the Application, but don’t worry about putting in a version. Click Create

2020-04-20_12-12-13.jpg

This is where we create the Package, I like to use the version in the naming.

2020-04-20_12-20-11.jpg

Click Create. Once that has finished creating and the console updated you should see the Notepad ++ Application listed. Select the Packages tab. You can see the package Status as Unpackaged, expand the Package and select Package

Add the name of the powered on Capture VM and search, Select the VM and click Package > Start Packaging.

I have already downloaded the Notepad++ and placed them on a share. Login to the Capture VM and browse to the share where the install is located and install the application. Once Notepad ++ is installed click OK to perform the Packaging. Select Yes to complete.

2020-04-20_12-53-20.jpg

Verify that the version is correct, also notice the drop down. If you packaged multiple Applications you can flip between them. Click Finalize and then OK to restart

After the VM has rebooted, login and select OK to complete the process. Revert to the VM to the last known good snapshot and power on.

From the AppVolumes Manager select Notepad++ under the Applications Tab. Now we are going to create a second Notepad++ package, but a different version using the method as before. Expand Notepad++ and Select Create Package

2020-04-20_13-13-41.jpg

This will flip to the packages tab. Fill in the in name etc. and select Create

2020-04-20_14-42-22.jpg

From the Packages tab select the new package that was just created and select Package to start the process. From this point do the same as last time to complete the install of the different version of Notepad++

2020-04-20_14-52-42.jpg

Once the second package is created you should see the following under the Applications Tab

0 Assignments, 2 packages and Current Flag not set

0 Assignments, 2 packages and Current Flag not set

Select Assign, Search for and select the AD Group you want to Assign this Application, select Assign

Note: Notice the Current Marker is not yet set. Meaning that no one will get a package, Yet. Also notice Assignment Type

Note: Notice the Current Marker is not yet set. Meaning that no one will get a package, Yet. Also notice Assignment Type

Go back to the Packages Tab, Select Notepad++ 7.8.3 and Select Set Current. Now we have SET the Current Package that will be received when an assigned user logins in to a desktop

2020-04-20_15-43-36.jpg

So is this not the same as AppVolumes 2.X?

If my users were using Notepad++ 7.8.3 and I needed to upgrade them to Notepad ++ 7.8.5 but I needed to test this new Package first, I can assign the new Notepad++ 7.8.5 to a different Security Group. Select Applications > Notepad++ > Assign. Search for the new test group for 7.8.5, then Select Package and Select the Package and Click Assign

Now when I look at the Application we see the following: 2 Assignments, 2 Packages

2020-04-20_15-58-29.jpg

Now swap back to the Packages Tab, select either Notepad++ Package and click Edit. For the Notepad++ 7.8.3 set the Stage to Published > Save and for the Notepad++ 7.8.5 set this to Test > Save

2020-04-20_17-33-55.jpg

Now from the list of applications you are able to see the Stage for the Application Packages. Once the testing is complete and you’re satisfied and want to use Notepad++ 7.8.5, go to the package you wish the users to receive and click Set CURRENT. The next time the users login they will get the updated package.

I set the 7.8.3 to retire, and 7.8.5 to Published.

I set the 7.8.3 to retire, and 7.8.5 to Published.

This is a first great step to help with Application Life-cycle.

Hope this helps.