DEM Application Profiling
I get asked a lot about “how do I find out what an application is using for registry and or files”. Well, there is a small tool that’s part of both standard and Enterprise versions within the VMware DEM zip file that’s under “Optional Components” called VMware DEM Application Profiler.msi

I personally like to create a AppCapture VM that is a clone of my master image, you can leave the applications on this image, but I like to clean up as much as possible by removing the agents. Now we have a dedicated VM, install the Application Profiler and then shutdown the VM and take a Snapshot.
Before you try the process, its worth looking at the following URL as someone may have already done the hard work. Make sure you test and validate before pushing to production.
When you are ready to “App Profile” the Application, power on the VM and install the application in question. If the Application is not part of the image you will need to install the application at this point, then open Application Profiler to start the process

The menu has a number of items that we will touch but for now select Start Session, assuming that the application is already installed just browse the Start Menu and select. For this example, I am using SketchUp

Select OK to start the Process
Note the executable that’s being analyzed

In this example I am going to close the SketchUp without making any changes to see what is captured.
After the session was stopped, I got the following in the Flex Config File.

Looks right, let’s assume it’s not. First, save the project within the App Profiler. Once its saved I am going to do this again but this time I am going to open a SketchUp file and make some changes within SketchUp.
Notice the change just from making a simple change, this is why I like to make changes within the Applications we are profiling.

Looking at the File System in Command Prompt lets check a few of these paths.

I am happy with these 2 paths, but I am not sure the <AppData>\.. This path doesn’t look correct, so I expand the “Optimization Level” to 3 under the File System. It’s a path to SketchUp so I leave it.


The Registry location looks correct, I have no idea what is needed with this location so I will leave this alone.
I want to go back and look at the Application Profiler to go over some of the settings and explore the <AppData>\..
I changed the Optimization levels to 3 under the Registry and File systems
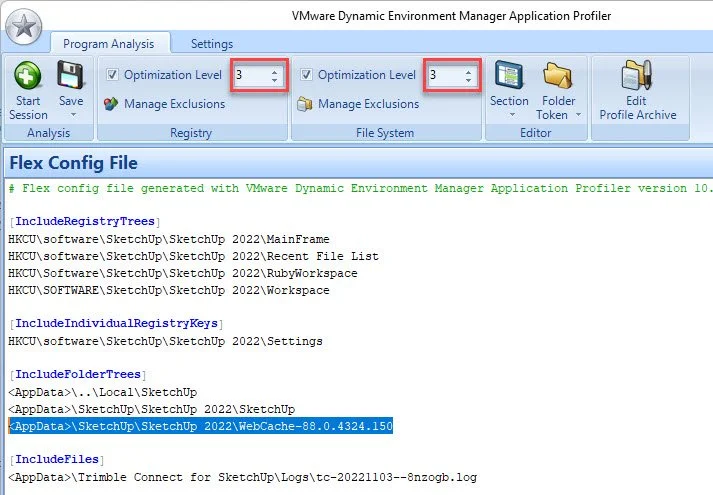
Now we see a lot more information about the folders and right away I see a WebCache folder. Looking at the size of folder, I am going to exclude it as it will cause the users to have slower logins as this information is copied from the DEM server to the user’s session. The overall size of the SketchUp folder is 20Mb, not huge at all but 75% is this WebCache folder. Again, this will need to be tested and validated as the cache maybe needed.
I would adjust the registry level back to 2 as so that it’s just looking at SketchUp 2022 and not the individual paths. Again, we could just capture the individual paths once we have a better understanding of the App. At the end of the day trying to capture what’s needed and prevent bloat.
I noticed the cache path that was captured and looked into this, there was a lot of file, are they needed I wasn’t sure, I add the path <AppData>\SketchUp\SketchUp 2022\WebCache* to the excluded Paths and click ok. This removes that from the Flex Config. I will also do it for anything else that may show up thats not wanted.

So, my final config looked like this.

Before I uploaded this to the DEM Config Share, I want to save the Project in case I need to come back and make changes.

Personally, I like to keep a couple of versions of the project, mainly a copy of the project unaltered.

Next, I will save the Config File and copy the 3 files to the DEM Configuration folder, refresh the DEM Management Console and the Application will be shown.
